This chapter contains the following topics:
Introduction to Positive Pay File Forms
Entering Positive Pay File Forms
Printing a Positive Pay Forms List
This selection allows you to design a text file that may be used to send to your bank for positive pay following the printing of checks.
Before you start, read the appendix Implement Positive Pay and Direct Deposit for the steps needed to use this feature.
A form file can be used with stub header, stub lines and certain check fields. For a list of available fields see the Positive Pay Form Fields appendix.
Payroll comes with several predefined file forms for positive pay. These predefined forms are provided following a new PBS installation in Company 00. They are also available in export files and can be restored for additional companies. In the top-level PBS you will find PRFORMS.zip or PRFORMS.tar. Extract this into the top-level PBS. It extracts PRFORMS00.EXP. You may restore it into company 00.
|
Note |
Multi-Company Note If you are using multiple companies and are using a company-ID other than 00, copy the PRFRMF00.EXP file, replacing 00 with your company-ID for each company. Then do a restore of the file for each company using the file utilities. |
When you enter a bank, using the CTL Banks selection, you must specify a positive pay form ID to be used. The form must exist in the Form file. The bank is associated with a cash account. When you select Checks and select a cash account, the form associated with the cash account in the bank will be used.
For a list of the predefined forms use the Reports, General (Positive pay forms) selection.
If you select to use a different form you can make a copy of an already existing form and modify the copy. You may also design your form from scratch.
An unlimited number of forms can be defined with this selection. We suggest that you first become familiar with the predefined forms provided.
Described below are definitions for certain terms used in this selection and in this chapter.
Each file consists of three information groups: Header, Check lines, and Totals.
is the first line(s) of the file. There is usually one line per file. This may contains information about your company, your bank, your bank account number and more.
are written under the header line. There will be as many check lines as there are checks printed. In other words there is one line per employee being paid on the check run.
are written usually as the last line of the file. The fields that are available are similar to the header fields. Normally payment amount totals are included in this record type.
An unlimited number of positive pay file forms can be defined with this selection. Positive pay forms allows you to select most of the fields from the employee and time transaction files.
Select
Positive pay forms from the Master Information menu.
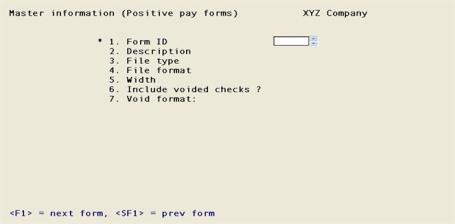
The following screen displays:
On this screen you identify the positive pay form with an ID, type, and description, You also define its general appearance.
From this screen you can work with both new and existing forms. If a form exists for the form ID and type you specify, that form appears and is available for changes or deletion.
Enter the following information:
1. Form ID
Options
Enter the ID for this form, or use the options:
|
<F1> |
For next form |
|
<SF1> |
For previous form |
|
<F2> |
Display a representation of the file output as Xs for alphanumeric fields, 9s for numeric fields and overlapping fields as question marks. This option is only available after you have selected an existing form. |
|
<F5> |
To generate a test file. This option is only available after you have selected an existing form. In the file it represents Xs for alphanumeric fields, 9s for numeric fields and overlapping fields as question marks. |
|
<F6> |
To copy a file to a different name. This option is only available after you have selected an existing form. |
|
Format |
Up to five characters |
|
Example |
Type: NMH |
2. Description
Enter the description of this form.
|
Format |
Up to 30 characters |
|
Example |
Type: NMH Bank CSV Format |
3. File type
Enter the character that designates the type of positive pay file that will be used. The types are listed below:
|
T |
Text file. This is a fixed length text format. |
|
C |
CSV format. This indicates a Comma Separated Value format. It is also called Comma Delimited. There is a comma after every field and will open in most spreadsheet applications. For an explanation of a CSV format file, see Comma-delimited |
|
Format |
1 character, either T or C |
|
Example |
Type C |
4. File format
This field determines if the positive pay file has line feeds only (LF) or both carriage returns and line feeds (CR/LF) at the end of each line. The choices are different depending on the operating system where PBS is installed.
The choices on a Windows system are 0 = Operating system default - CR/LF DOS file or 1 = Line feed only Linux file. On a Linux server the choices are 0 = Operating system default - line feed only UNIX/Linux file and 1 = CR/LF DOS file.
If you are unsure which file format to use, ask someone from your bank the format they prefer. If you are still unsure, select the operating system default and send a test ACH file to your bank using that choice. A representative from the bank will let you know if you need to try the other option.
|
0 |
For the system default. For a system installed on Windows this is: CR/LF DOS format For a system install on a Linux server: LF only in Linux |
|
1 |
For a system installed on Windows, the choice will display as: Line feed only UNIX/Linux file. On a Linux server installed system this will display as CR/LF DOS file. |
|
Format |
One number, either 0 or 1 |
|
Example |
Press <Enter> for the default |
5. Width (max = 9,999)
This field will display as (Not applicable) if you selected a CSV form type.
Enter the number of columns that may be written to each record of the text file.
|
Format |
Up to four digits |
|
Example |
(Not applicable) in this case |
6. Include voided checks?
Consult with your bank contact person to determine if they want a list of the voided checks in the positive pay file. These are the options:
|
Y |
To include voided checks |
|
N |
To not included voided checks |
|
Format |
One character, either Y or N, N is the default |
|
Example |
Type: Y |
7. Void format
This field can not be entered if you selected N for field 6.
Select how you want the void check amounts to be written to the positive pay file.
|
1 |
Show void amount as zero |
|
2 |
Show void as a negative amount |
|
3 |
Show void as a positive amount |
|
Format |
One character, either 1, 2, or 3 |
|
Example |
Type: 2 |
8. Omit header record ?
Consult with your bank contact person to determine if they want a header record in the positive pay file. These are the options:
|
Y |
To remove the header record |
|
N |
To include the header record |
|
Format |
One character, either Y or N, N is the default |
|
Example |
Type: Y |
Field number to change ?
Make changes as needed. If it is a new file format, after you select <Enter> the Field Definition Screen will display. For an existing form you are then asked the following:
View/change form layout ?
Answer Y if you wish to review or work with any of the fields to be printed on the form. Otherwise select N to remain on this screen with the cursor moving back to the Form ID field. The default is Y.
|
Format |
One character, Y or N |
|
Example |
Press: <Enter> |
When defining a new form, or if you specified to view the layout of an existing form, the screen appears as such:
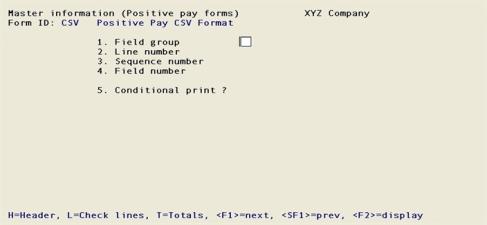
On this screen you determine each field to be written to the positive pay file. Many fields may be selected to be written to the file.
For each field, enter the information as follows:
1. Field group
Enter H if the field is part of the Header group, L for the Check lines group or T for the Totals.
|
H |
For Header group |
|
L |
For Lines group |
|
T |
For Totals |
Options
You may also use one of the options:
|
<F1> |
For next field on file |
|
<SF1> |
For previous field on file |
|
<F2> |
To display the form as it appears so far (see the section titled Displaying a Form later in this chapter) |
|
Format |
One letter from above |
|
Example |
Type: H |
2. Line number
Enter the line number on which this field is to be generated in the file, or press <F1> to the display the next field on file within this group.
|
Format |
One digit, 1 through 9 |
|
Example |
Type: 1 |
If this is a text file, field 3 will display as Column, and if it is a CSV file, it will display as sequence number.
3. Column
or
Sequence number
Options
Enter the sequence number or column in which to generate this field, or use the Option
|
<F1> |
To display the next field past line one |
|
<F2> |
To insert a new line |
|
<F3> |
To delete the current line |
|
Format |
Up to three digits |
|
Example |
Type: 1 |
Your entry may not be greater than the width of the form.
At 4. Field number field, the screen displays as follows:
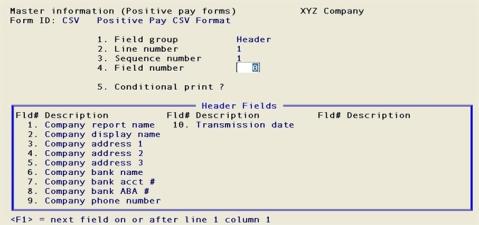
The window that displays at the bottom of this screen shows the 10 fields available for printing from the Header group.
If you specify a Line or Totals group, a window with different fields will display. The line group has more fields than will display in the window. To see the other fields press <PgDn>. To return to a previous window press <PgUp>.
If you had previously selected any of these fields to print on this form, an asterisk appears next to the field number.
Refer to the Positive Pay Form Fields appendix D, for a description of each field from each group.
Continue entering the information as follows:
Options
Enter the number of the field that you wish to select, or use one of the options:
|
<F1> |
To display the next field on file that is on or after this line number and column number. |
|
<SF1> |
To display a previous field. This will not display until a field has been selected through <F1>. |
|
<Enter> |
To enter a Literal (text) instead of a field number. Refer to Literal Fields section of this chapter. |
|
Format |
Up to three digits, however there are less than 99 fields per field group available |
|
Example |
Type: 1 |
See Alphanumeric, Numeric, Date, and Literal Fields.
5. Conditional print ?
Answer Y if this field is to print only when some field (to be specified next) meets a specific condition. Answer N if this field should always print.
|
Format |
One character |
|
Example |
Type: N |
If you answer Y, these additional fields appear:
When Field-# 999
When the field selection window appears enter the number of the field upon which printing is dependent. Use the <PgUp> and <PgDn> keys to view additional windows.
|
Format |
Three characters |
Enter the conditions that this field must meet when being generated.
is
First, enter one of the following abbreviations:
|
Condition |
Description |
|
EQ |
equal to |
|
NE |
not equal to |
|
GT |
greater than |
|
LT |
less than |
|
GE |
greater than or equal to |
|
LE |
less than or equal to |
(value)
Then enter the value that the dependent field must contain to complete the condition. Press <Enter> to indicate a value of zero (for a numeric or date field) or spaces (for an alphanumeric field).
|
Format |
25 characters (alpha) |
|
Example |
Not used in this case. |
If you need to write a field to the positive pay file when either one condition or another is met, define the field specifying the first condition as described above. Then redefine the field, using the same line number, column number and field number.
After entering the field number the following message displays:
This field is already defined.
Do you wish to define a duplicate ?
Answer Y to define the duplicate field and complete the definition, specifying the other condition under which the field is to print.
This allows printing under one condition or the other. There is no way to request printing when both conditions are true.
The remaining fields control how the data is written to the file. The fields displayed depend on the type of field you selected in the 4. Field number field. There are four different types:
These may contain any combination of letters, digits, and special symbols. See Alphanumeric Fields
They only contain digits, along with any decimal points, minus signs or parentheses (for negative numbers), and commas. See Numeric Fields
These only contain dates. Check date fields may be formatted. See Date Fields
These contain text that you type. Literal fields are defined by pressing <Enter> at Field number, rather than specifying a field number. See Literal Fields
The following two fields display for each alphanumeric field:
6. Length
Enter the number of characters you want to be written to the file for this field, up to the maximum number shown, or press <Enter> for the maximum length of the field.
|
Format |
Up to two digits |
7. Justify
For Most Fields
enter R to right-justify the field, or press <Enter> for no justification, to print the characters as entered.
If you specify right-justify, the characters will be aligned with the right-hand margin of the space for this field.
For the Employee Name Field
The employee name is expected in a certain format. See the Employee Name Format in the Employees chapter.
If it is the employee name field then you have the following justify options:
| Option | Description |
|---|---|
|
C |
As printed as on the check |
|
L |
Left justify, first name last name |
|
G |
Left justify, last name first name |
|
R |
Right justify, first name last name |
|
S |
Right justify, last name first name |
|
<Enter> |
As on employee record (this is the default) |
8. Print without ?
Field number 8 is only available as an alphanumeric field when you are entering the employee name field.
When it is an employee name field you have the following Print without options:
| Option | Description |
|---|---|
|
C |
Commas |
|
P |
Periods |
|
S |
Spaces |
|
A |
All three, Commas, Periods and Spaces |
|
N |
Print all three |
If the field has a Y it will act the same as if it has a C.
The following five fields display for each numeric field:
6. Integer digits
Enter the number of integers (digits to the left of the decimal point) you want to print in this field, up to the maximum shown, or press <Enter> for the maximum shown.
|
Format |
Up to two digits |
7. Decimal digits
(If the field has no decimal places, (Not applicable) displays here.)
Enter the number of decimal places you want to print, up to the maximum shown, or press <Enter> for the maximum shown.
|
Format |
One digit |
You may enter 9 to float the decimal position. This means that if there are zeros after the decimal, the zeros do not display.
8. Show decimals ?
Answer Y to write decimals to the file.
|
Format |
One letter, either Y or N. |
9. Leading zeros ?
Answer Y to include any beginning zeros when printing this field.
|
Format |
One letter, either Y or N. |
10. Negatives ?
(If the field cannot be negative, (Not applicable) displays here.)
Enter the letter that designates how negative numbers are printed, as follows:
|
R |
Minus sign to the right of the number |
|
L |
Minus sign to the left of the number, in a fixed position |
|
F |
Minus sign to the left of the number, in a floating position |
|
Format |
One letter from the table above |
When you complete entry of a numeric field, the print format of the field as you have defined it is displayed on the screen.
The Format field displays for each date field.
6. Format
For a date field, select the format to use when printing this field as follows:
|
1 |
MM/DD/YY (03/31/15) |
|
2 |
MMM DD YY (Mar 31 15) |
|
3 |
MMM DD (Mar 31) |
|
4 |
DD-MMM-YY (31-Mar-15) |
|
5 |
Month DD, YYYY (March 31, 2015) |
|
6 |
MMDDCCYY (Display depends on separator value used) |
|
7 |
DDMMCCYY (Display depends on separator value used) |
|
8 |
CCYYMMDD (Display depends on separator value used) |
|
9 |
MMDDYY |
|
Format |
One digit |
Field 6, 7 and 8 require a separator value.
Separator
The value for this field will display as N/A (Not applicable) if you selected date field formats of 1, 2, 3, 4 or 5. For check formats 6, 7 or 8 select the separator value to print between the day, month and year:
|
1 |
None |
|
2 |
Dash |
|
3 |
Period |
|
4 |
Space |
|
5 |
Slash |
|
Format |
One digit, either 1, 2, 3, 4 or 5 |
Leading zeros ?
For formats 6 and 7 you must define whether a leading zero is needed for the month using format 6 and the day for format 7.
For example, without a leading zero the date could be 4092012. With a leading zero the date is 04092012. Notice that the first example is 7 digits long and does not start with a zero . The second is 8 digits long and does start with a zero.
|
Format |
One letter, either Y or N. |
When you complete entry the print format of the date or time as you have defined it is displayed on the screen.
The following three fields display for each literal field:
6. Length (max = 80)
Enter the number of characters to be used when printing this field, up to the maximum shown, or press <Enter> for the maximum shown.
A total of 1000 characters is available for printing all literal fields on a form, with a maximum of 80 characters for each. (A message displays when less than 150 characters are available.)
|
Format |
Up to digits |
7. Text
Enter the exact text to be printed, up to the length specified in field # 6.
|
Format |
Up to 30 characters |
A test file can be generated.
To test your form file, at the first Forms screen press <F5>. A window displays where you must enter a bank. Enter your Company ACH bank type as defined in CTL Banks.
Then select <Enter> and the form file will be generated to the same path as defined in the bank record.
If you are on Windows or Thin client and you have selected to merge data with a form file, the form file will print with the test check form.
You can rapidly produce a new positive pay form by copying an existing form that is similar to the new one. After copying the form, tailor the new form by changing the form and field information as necessary.
To copy a form, at the first Forms screen
Display the existing check form that you wish to copy and press <F6>.
A window displays for you to enter the following information:
Copy to form ID
Enter the ID of the new form. The form ID will be automatically created during the copy process if it does not already exist.
After the copy process is complete you may change the new form as needed.
This selection prints a report that lists the positive pay forms you have defined. You may select to print a specific form type or all form types for the forms.
For each form type on the list you are shown general information. The field definitions for each form type may also be optionally printed.
Select
Positive pay forms from the Reports, General menu.
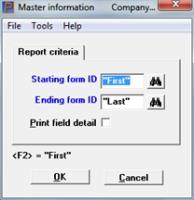
This is the screen you see:
Graphical Mode
Character Mode
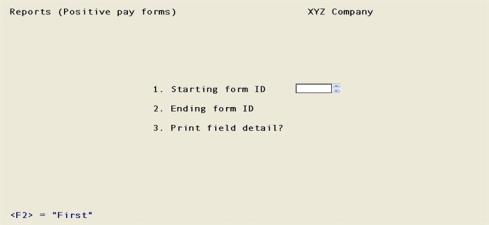
On the screen that appears, enter the following:
Ending form ID
Enter the range of form IDs for which to print the list. Follow the screen instructions.
Options
You may also use the following option:
|
<F2> |
For "First" and "Last" on the Starting and Ending form ID fields |
|
Format |
Up to five digits |
|
Example |
Press <F2> at both fields |
Check this box or use the default of Y to print the information defined for each field on a form. Unchecked the box or enter N to only print the general information about a form.
|
Format |
Graphical: Check box where checked is yes and unchecked is no. The default is checked Character: One letter either Y or N, the default is Y |
|
Example |
Press <Enter> to accept the default |
Make any changes and then click OK to print the report or Cancel to return to the menu without printing.
Character Mode
Make any changes and the select <Enter> from Field number to change to print the report. Select <Esc> to return to the menu without printing.